Salesforce Certified Application Architect

Friday, 13 October 2017

Raising and Handling Custom Events in Salesforce Lightning

Now if we need to understand in Lightning terms, then we create different events which will be used by components to interact between them. Below are different steps for this event handling:
  • Create a Lightning event and create different attributes in it which can be used to pass information between components.
  • Component which want to fire an event needs to first register for an event by using <aura:registerEvent>. Then only it can fire an event and other component can receive it.
  • Component which wants to receive information will handle the event using <aura:handler> and type as Ligthning Event which we create.


Application Events vs Component Events : How to use for handling custom events in Lightning

Application Events vs Component Events : Which/How to use for handling custom events in Lightning

Lightning framework is based on event-driven architecture which allows to communicate between different events. Lightning events can be fired or handled by javascript controller. Event are triggered by user action.

As we know that along with system events, there are 2 types of custom lightning events:
  • Application Events
  • Component Events
Here I am going to explain difference between them along with code sample.
Component Events 
  1. Components events can be handled by same component or component which is present in containment hierarchy (component that instantiates or contain component).
  2. Below is syntax for creating component event.

     <aura:event type="COMPONENT" description="Event template" >                                          <aura:attribute name="msg" type="String" access="GLOBAL"/>                                               </aura:event>

  3. Below is syntax for firing component events from javascript controller.

    var accidentEvent = component.getEvent("newCarAccident"); accidentEvent.setParams({"msg":"New Message!!!."});                               accidentEvent.fire();

  4. While handling component events, we need to specify name attribute in  <aura:handler>

    <aura:handler action="{!c.handleNotification}" event="c:carAccidentComponentEvent" name="newCarAccident">

    Make sure that name attribute is same as that of name attribute while registering the event.


Application Events
  1. This kind of events can be handled by any component which is listening to it (have handler defined for event). It is kind of publish-subscribe modal.
  2. Below is syntax of creating application event.

    <aura:event type="APPLICATION" description="Event template" >                                                     <aura:attribute name="msg" type="String" access="GLOBAL"/>                           </aura:event>


  3. Below is syntax to file application events from javascript controller.

    var appEvent = $A.get("e.c:carAccidentAppEvent");               appEvent.setParams({"msg":"New Message!!!."});                                               appEvent.fire();

  4. While handling application events, no need to specify name attribute in <aura:handler>

    <aura:handler event="c:carAccidentAppEvent" action="{!c.handleNotification}"/>
System Events
  1. These events are fired automatically by the framework such as during component initialization, attribute value change, rendering etc. All Components can register for system events in their HTML markup.
  2. Few examples of system events are init, aura:waiting, aura:doneWaiting, aura:doneRendering etc.
  3. If app or component is rerendered, then init event is fired. If server side call is made in init then, aura:waiting event is fired. Once the server call is finished then aura:doneWaiting event is fired. After this aura:doneRendering is fired.
Events Best Practices:
  1. Always try to use component events. Component event usage is more localized as these can be used by same component or component in containment hierarchy.
  2. If you use application events then it may fire system events.
  3. Use Application events only if components are present in 2 different app or are not in containment hierarchy.
I have created GitHub project which contains example demo for Application events and Component Events. You can download complete code from below URL:

Hope this help!!!

Thursday, 12 October 2017

Open a record create or edit page, or navigate to a record in salesforce lightning

force:createRecord:

 To create a new record:
1
2
3
4
5
6
7
createRecord : function (component, event, helper) {
    var createRecordEvent = $A.get("e.force:createRecord");
    createRecordEvent.setParams({
        "entityApiName": "Contact"
    });
    createRecordEvent.fire();
}

force:editRecord

To Edit a existing record:
1
2
3
4
5
6
7
editRecord : function(component, event, helper)
    var editRecordEvent = $A.get("e.force:editRecord");
    editRecordEvent.setParams({
      "recordId": component.get("v.contact.Id")
   });
    editRecordEvent.fire();
}

force:navigateToList

To navigate to a list view, set the list view ID on the listViewId attribute and fire the event.
1
2
3
4
5
6
7
8
9
10
11
12
13
14
15
16
17
gotoList : function (component, event, helper) {
    var action = component.get("c.getListViews");
    action.setCallback(this, function(response){
        var state = response.getState();
        if (state === "SUCCESS") {
            var listviews = response.getReturnValue();
            var navEvent = $A.get("e.force:navigateToList");
            navEvent.setParams({
                "listViewId": listviews.Id,
                "listViewName": null,
                "scope": "Contact";
            });
            navEvent.fire();
        }
    });
    $A.enqueueAction(action);
}
This Apex controller returns all list views for the contact object
1
2
3
4
5
6
7
@AuraEnabled
public static List&lt;ListView&gt; getListViews() {
    List<ListView> listviews =
        [SELECT Id, Name FROM ListView WHERE SobjectType = 'Contact'];
     // Perform isAccessible() check here
    return listviews;
}

force:navigateToObjectHome

Navigates to the object home specified by the scope attribute.
1
2
3
4
5
6
7
navHome : function (component, event, helper) {
    var homeEvent = $A.get("e.force:navigateToObjectHome");
    homeEvent.setParams({
        "scope": "myNamespace__myObject__c"
    });
    homeEvent.fire();
}

force:navigateToRelatedList

 Navigates to the related list specified by parentRecordId.
1
2
3
4
5
6
7
8
gotoRelatedList : function (component, event, helper) {
    var relatedListEvent = $A.get("e.force:navigateToRelatedList");
    relatedListEvent.setParams({
        "relatedListId": "Cases",
        "parentRecordId": component.get("v.contact.Id")
    });
    relatedListEvent.fire();
}

force:navigateToSObject

Navigates to an sObject record specified by recordId.
1
2
3
4
5
6
7
8
createRecord : function (component, event, helper) {
    var navEvt = $A.get("e.force:navigateToSObject");
    navEvt.setParams({
      "recordId": "00QB0000000ybNX",
      "slideDevName": "related"
    });
    navEvt.fire();
}

force:navigateToURL

 Navigates to the specified URL.
1)   Using a relative URL.
1
2
3
4
5
6
7
gotoURL : function (component, event, helper) {
    var urlEvent = $A.get("e.force:navigateToURL");
    urlEvent.setParams({
      "url": "/006/o"
    });
    urlEvent.fire();
}
2)   Using external website when the link is clicked.
1
2
3
4
5
6
7
8
9
10
navigate : function(component, event, helper) {
   
    //Find the text value of the component with aura:id set to "address"
    var address = component.find("address").get("v.value");
    var urlEvent = $A.get("e.force:navigateToURL");
    urlEvent.setParams({
      "url": 'https://www.google.com/maps/place/' + address
    });
    urlEvent.fire();
}

Sizing : Sizing utilities allow for easy width sizing on an element.


<div class="demo-only demo-only--sizing slds-grid slds-wrap">
  <div class="slds-size_1-of-3">
    <div class="slds-box slds-box_x-small
        slds-text-align_center slds-m-around_x-small"> 
        .slds-size_1-of-3</div>
  </div>
  <div class="slds-size_1-of-3">
    <div class="slds-box slds-box_x-small 
           slds-text-align_center slds-m-around_x-small"> 
           .slds-size_1-of-3</div>
  </div>
  <div class="slds-size_1-of-3">
    <div class="slds-box slds-box_x-small 
      slds-text-align_center slds-m-around_x-small"> 
     .slds-size_1-of-3</div>
  </div>
  <div class="slds-size_1-of-3">
    <div class="slds-box slds-box_x-small slds-text-align_center
      slds-m-around_x-small">.slds-size_1-of-3</div>
  </div>
  <div class="slds-size_2-of-3">
    <div class="slds-box slds-box_x-small slds-text-align_center
      slds-m-around_x-small">.slds-size_2-of-3</div>
  </div>
  <div class="slds-size_3-of-3">
    <div class="slds-box slds-box_x-small slds-text-align_center 
      slds-m-around_x-small">.slds-size_3-of-3</div>
  </div>
</div>


The Component Bundle in Lightening

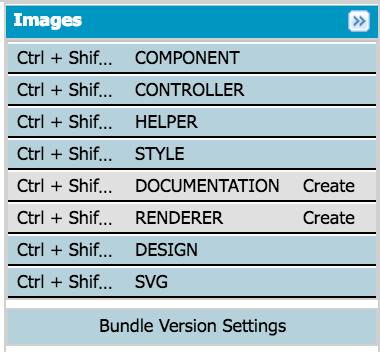
When you create a new Lightning component you create what Salesforce calls a bundle. Below is an image of a bundle generated in the Developer Console and a brief explanation describing the purpose of each file.
({
  handleSelectedSObject: function(component, event, helper) {      
    helper.processObjectHelper(component, event, helper);
  },
  handleCustomEvent: function(component, event, helper {
    helper.processEventHelper(component, event, helper);
  }
})
  • HELPER: This contains functions that contain business logic and reusable code. It is best practice to pass in component, event and helper but it is not necessary.
({
  processObjectHelper: function(component, event, helper) {
    var customAttribute = component.get(‘v.customAttribute’);
  },
  processEventHelper: function(component, event, helper) {
    component.set(‘v.customAttribute’, ‘new value’);
  }
})
  • STYLE: This applies encapsulated CSS to the component
.THIS {
  background-color: white;
}
.THIS.customClass {
  background-color: red;
}
  • DOCUMENTATION: This is an optional file containing additional information
  • RENDERER: This is an optional file used to customize the default rendering behavior of the framework
({
  render: function(component, helper, event) { },
  rerender: function(component, helper, event) { },
  afterRender: function(component, helper, event) { },
  unrender: function(component, helper, event) { }
})
  • DESIGN: This is a configuration file is used to expose attributes to the setup section of the Lightning App Builder
<design:component label=”Example Component”>
  <design:attribute name=”configurableAttribute” label=”Configurable Attribute” description=”Configurable Attribute” /></design:component>
  • SVG: Used to store custom SVG used for the component
The simplest components only need the component file. If you want to add custom JS code, you’ll need a controller and helper.

Salesforce Certified Application Architect & Certified Data Architecture and Management Designer Exam

How to pass Salesforce Certified Data Architecture and Management Designer Exam This exam was 1st architect exam for me. Its not that muc...